In an earlier post titled
More stage gear for live playing I discussed often overlooked stage gear, such as XLR cables and splitters, mic pre-amps and a few microphones. That post was a continuation of
Clamps and goosenecks, which itself was inspired by a post centered on
Cheap, but surprisingly good microphones. This post will cover some odds and ends that aid in setting up mics and managing cables for live playing in typical small venues.
Let's start with XLR cable for your mics. I use Seismic Audio's 25' cables, which I buy in packages of six.
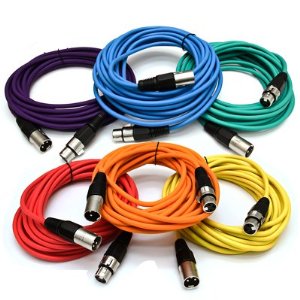
First, these are a good length for most venues, especially when used with a snake such as this one, which I will cover further on.
The construction is top notch, and the color coding adds value because it makes managing stage cables a lot easier. Following a cable of a specific color is a lot easier than reading small labels on cable ends in dim light.
Ends have strain reliefs, which add to the reliability and life of the cables, and the connectors can be easily unscrewed for repairs.
If you want to adapt these to 1/4" jacks for mixers that do not provide XLR ports, use an XLR female adapter such as this one:

You can also use an XLR male adapter on the other end. It is a good idea to keep a few of these handy.

Now, the snake. I use a Seismic Audio 20' 4-channel XLR model. because my mixers are only 8 port models, and I reserve two ports for keyboards, leaving me two spare ports for impromptu use. Mine is shown in this photo:

It's the small details, such as the numbering on each XLR jack in the box, as well as the cable ends, that inspired me to get this model. I also like the the strain reliefs on the main trunk and fan. An indicator of reliability and quality is the gauge of the cables, the sturdy connectors and the heavy duty box. These all add up to a product that will stand some abuse.
Thus far the 20 foot model has met my every need, but the small, incremental increase in price for the longer model would have been a worthwhile investment in a snake that would meet possible future needs. Here is the next larger model (in ports): Seismic Audio 20' 8 XLR port snake.

The devil is always in the details. Sometimes it's the small things that keep us sane. In my case it's something as simple as velcro cable ties.
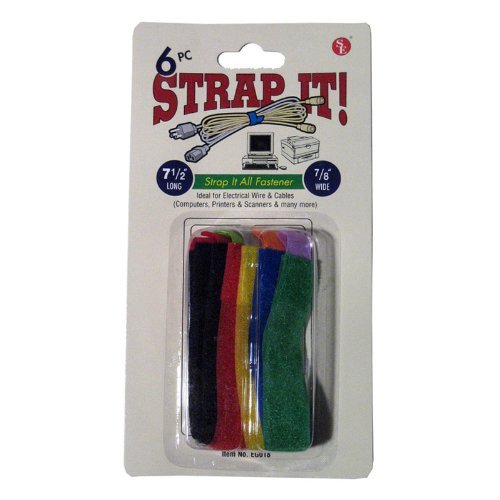
I use these in my home music practice space that doubles as a studio. Prior to grabbing a few packs I was tripping over instrument, microphone and speaker cables. Literally!
Major pluses are the length (7.5" will attach a bundle of cables to a stand) and color coding. Since the twelve pieces are really two identical packs of six, you can tie off at the rack end using, say, blue, then when you are fanning out that bundle at the other end of a stage you can tie off right before the fan-out with the same color.
The width, too, is more than sufficient for any live stage or studio situation. 7/8" is wide enough to be seen from a distance (again, the color coding helps). I also use a product called velcro 'One Wrap' ties:
>
To illustrate the value of these simple ties this photo of my music room that shows them in action.
>
This brings us to microphone stands, at which point I am going to wrap this post up. At some point in the near future I will discuss power management (very important and too often done as an afterthought).
I will limit the discussion to stage stands, since my post titled Clamps and goosenecks covered close-in microphone placement.
We'll play good, better, best. First up is good, the ubiquitous On Stage Boom Stand:

This is also branded as Musician's Gear. This stand is probably one of the most popular among smaller bands, jammers and home studio owners because I run across them everywhere. And like everyone else I wound up with a few of my own. Here is what I have learned during the four or so years I have owned and used this model:
- For the money they are a bargain and work extremely well in home studios and practice spaces (assuming the areas are not overly cramped.)
- They hold up under light gigging and jamming, meaning they are not transported more than two or three days a week.
- Good stability inside, even with heavier microphones. Not so good outside if there is a fair breeze.
I lost one to stepping inadvertently on one of feet, which immediately broke, and another has started binding when I try to extend or collapse the center pole. Those problems are not necessarily quality issues since in the case of the broken tripod it was my fault and not the gear's. As for the binding - I am sure that a good amount of grime has found its way into the tube after four years of use and transporting the stands. Had I taken better care of them those problems may have been prevented.
Better: Seismic Audio's tripod boom stand:

The best feature is the fact that you can place a voice mic at the top of the stand, which has a normal threaded post, and also use the boom for another microphone. Or leave off the top mic and just use the boom. Where this comes in handy is the stand will allow someone who plays both flute and saxophone, for example, to pre-set the mic placements and use a single stand for both. Or, for crowded stages, two vocalists can share the same stand, or instrumentalists (or a combination.)
Another use is to add another boom to the top post for overhead mic placement. One boom I use (and recommend) is the On Stage mic boom.
Overall, this is a nicely built, versatile stand that will withstand moderate gigging (not sturdy enough for touring), and a great addition to any home studio.
Best: On Stage round base microphone stand:
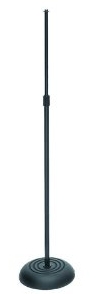
This stand is practically indestructible and is ideal for gigging. If you need a boom, simply add an On Stage mic boom and you're good to go.
In addition to being indestructible, this stand takes of far less stage (or studio) real estate than a tripod type stand. And despite the relatively small size of the base, it is far more stable than the tripod stands. Admittedly, this stand is a great deal heavier, so if weight is an issue you may not like this type.
Even with a boom fully extended I have found this stand to be stable. For outside use in fair breezes this stand remains upright, which is not always the case with the tripod types. Moreover, there are no legs to break (I have lost one tripod stand to that problem.)
If you transport your gear often, and especially if you play outside (or inside on cramped stages) this stand is the best choice in my opinion.
Since I've mentioned the On Stage mic boom twice I think it merits a few words.

Some features I like include precision machined threads that easily mate with other devices such as the On Stage round base microphone stand. The small counter weight on the arm is a nice touch too. I use relatively heavy mics, and the counterweight, as well as the lever that allows you to adjust the boom angle, keep your settings rock solid.
One final stand, which is the Samson Audio MB1 Mini Boom Microphone Stand.

While I generally do not mic bass drums, when I do this stand allows me to do it my way, which may seem unconventional to some folks. I place the mic on the batter side of the drum about three feet back. Since this can be problematic with the floor tom and throne (and hi-hat) hindering access, the boom and adjustability of this stand are a great help.
Where the stand shines if micing amps. Some small amps, such as the Fender Champion 600 are usually placed on a raised surface to keep them off the floor. This stand will reach any stand that is chair seat height. For larger amps that are on the floor or tiltback stands, this mic stand will still allow you to position the mic where you need it.
My use is relatively narrow - kick drums and amps. But for each, this stand is excellent in my opinion. With the mics I am using it is heavy enough to remain stable, and for where I need to place those mics, it allows me to do so with relative ease.
My next stage gear related post will cover power management. I hope these are helpful.