Also, I just posted a discussion of Gerry's site and additional information about some of the better brush players in an article titled Appreciating Brushwork and Some History.
Tuesday, August 31, 2010
Addendum to For Brush Players: A New Site
In my last post I discussed the relationship between tap dancing and brush playing, and also commented on additional relationships that Gerry Paton uncovered in his research. Subsequent to my posting Gerry told me about a book of essays, The Jazz Cadence of American Culture, that connects some of the dots between and among the influences. I just placed an order for the book and will write about it at a later time.
For Brush Players: A New Site
Brush playing is one of my personal joys. I have written a few articles and reviews on the subject, including On Playing Brushes Part 1: The Vocabulary, On Playing Brushes Part 2: Creative Writing, and On Playing Brushes Part 3: The Thesaurus. I recently came across a new site, Brush Beat, that contains some remarkable content written by Gerry Paton.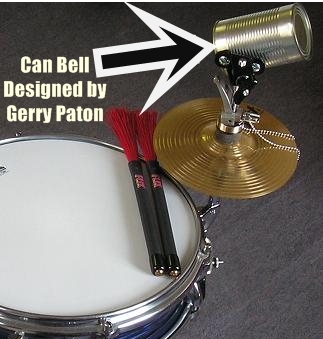
Full instructions for making your own are provided in Making a Canbell. The other article on this page shows how to cross stick with brushes.
Although the site is new, he has two sections that are well worth reading:
- Articles containing one of the best researched pieces on early brushes and how they were played, and one on the history and evolution of the original brushes
- Tips and Tricks that contain two (for now) articles on making brush-friendly instruments and playing techniques
What makes this article particularly valuable is Mr. Paton's view of the roots of brush playing departs from conventional thought, which is tap dancing. In the book that accompanies The Art of Playing Brushes, Mark Griffith wrote a chapter titled A History of the Brushes in which he delves into the relationship between tap dancing and brushes. Also, on his instructional DVD, Brushworks - The DVD, Clayton Cameron devotes a segment to the same relationship. The arguments are compelling and valid. However, Mr. Paton cites a deeper source: shoe shine boys who employed their individual rhythms in brushing down their customers with whisk brooms after they shined the shoes. He backs this up with copious citations within the article. He also traces the development and evolution of suitcase drumming in which brushes were used, as well as the importance of barbershops as musical centers of gravity and where some of the whisk broom rhythms were born and evolved. In the latter it appears that Louisiana was particularly important. The irony is the pioneering New Orleans drummers, such as Louis Cottrell, Sr and Baby Dodds eschewed brushes.
In addition to the roots of brush playing, this article also traces back the development of the brush itself. The design of the original brushes - indeed, the brush itself - was a fly swatter circa 1895. That device's history is contained in the second article in the articles page titled, What Swat: a guide to early wire brushes. If you are interested in the history of brushes and brush playing, Mr. Paton's impeccable research and excellent writing add significantly to the history and body of knowledge.
The Tips and Tricks page is devoted to more practical aspects of brushes: playing them and novel devices to break through the limitations of percussion instruments. For example, Mr. Paton has designed a Canbell that has the sensivity for brush playing that is difficult to achieve with a cow bell. The device looks like this:
Full instructions for making your own are provided in Making a Canbell. The other article on this page shows how to cross stick with brushes.
Based on the content already on this new site I anticipate more well researched and/or thought out articles and tips from Mr. Paton. If you play brushes or are interested in mastering them I highly recommend visiting and bookmarking the site.
Tuesday, August 24, 2010
A Cross Post: The Savoy King movie
I am cross posting this from my Music for Drummers blog because I think that the audience for Snare Drum Addict will appreciate the information as much as the audience for that blog.
A few months ago I received an email from a producer named Jeff Kaufman, who informed me about a movie about the great Chick Webb and the Savoy Ballroom. The movie also features Ella Fitzgerald and other notables from that era who were connected with the Savoy and Chick. Because of a personal tragedy I am only now starting to write again.
For more information about Chick, recommended recordings and links to more information, see my March 11, 2010 post.
A few months ago I received an email from a producer named Jeff Kaufman, who informed me about a movie about the great Chick Webb and the Savoy Ballroom. The movie also features Ella Fitzgerald and other notables from that era who were connected with the Savoy and Chick. Because of a personal tragedy I am only now starting to write again.
The best way to present the project is to use Mr. Kaufman's description:
Chick's brief, inspiring life illuminates the society-changing power of music, the life-lifting effect of mentoring, a hard-fought breakthrough in racial understanding that reverberates today in many ways, and the ability of everyone (with or without disabilities) to reach beyond their apparent limits. Produced with The New Heritage Theatre Group (New York's oldest non-profit Black theater), The Savoy King: Chick Webb And The Music That Changed America weaves together newly filmed stories from remarkable people who knew Chick Webb at every phase of his life, with quotes from some of the greatest figures in Jazz history. Bill Cosby has voiced the words of Chick Webb, and we also have Tyne Daly voicing Jazz publicist Helen Oakley Dance, Ron Perlman as Gene Krupa, Andy Garcia as Mario Bauzá, and Danny Glover as Count Basie. We just had a screening of the rough cut, which we will now polish. Unfortunately, I've hit a financing wall at this crucial time, and I am urgently seeking tax deducible finishing funds to complete our work. Donations are tax deductible, and any level of support can make a big difference.Since I am a big fan of that era, and revere Chick, I found the news of this project to be exciting. Chick's name is becoming a dim memory among drummers, and too many younger drummers never heard of him. To keep his name and accomplishments alive is, to me, important. Mr. Kaufman's project could be not only a loving tribute, but may spark interest in the newer generations, which could revive swing in much the same way Squirrel Nut Zippers and similar groups did in the 1990s.
As you know, the Savoy Ballroom was the home of the amazing Lindy Hop dancers, and the first venue in America where Blacks and Whites could dance and socialize together. It had a huge, but largely unheralded social impact. Born fatherless and poor, Chick Webb developed spinal tuberculosis and was a hunchbacked dwarf in constant pain, yet he virtually invented modern drumming and built the hottest band of the 1930s (it was the Savoy Ballroom's "house band"). Chick was mentored by Duke Ellington, toured with Louis Armstrong, argued with Jelly Roll Morton, jammed with Artie Shaw, married a beautiful dancer, discovered and practically adopted Ella Fitzgerald (in many ways, their relationship is the heart of the film), beat Benny Goodman and Count Basie in legendary battle of the bands, befriended Mario Bauzá ("The Father of Afro-Cuban Jazz"), encouraged a struggling Dizzy Gillespie, and helmed the first Black band to host a national radio show . . . all before drumming himself to death at age 30.We've been privileged to film with some terrific people, each who could warrant their own documentary. They include: drummers Louie Bellson (with, I believe, his last filmed drum performance) and Roy Haynes (among other things, he does a charming scat version of A-Tisket, A-Tasket), trumpeter Joe Wilder, playwright-actress Gertrude Jeannette, Swing dance masters Frankie Manning and Norma Miller, basketball star John Issacs, composer-arranger Van Alexander, longtime Harlem physician Dr. Muriel Petioni, childhood friend Rev. Edward Wilson (minister emeritus at Waters AME Church), Ella Fitzgerald's son Ray Brown Jr., the son of the Savoy Ballroom's owner, and Chick's jazz-loving nephew.
A better overview of the project is on Floating World Pictures page titled The Savoy King: Chick Webb and the Music that Changed America.
If you are not familiar with Chick or the Savoy Ballroom, this clip from Jazz: A Film by Ken Burns is a quick introduction:
For more information about Chick, recommended recordings and links to more information, see my March 11, 2010 post.
Additional information that came after I posted the above on Music for Drummers:
The producer, Jeff Kaufman, just sent me two additional links to share:
Enjoy.Sunday, August 22, 2010
Ludwig Has a Near Miss: 1930s Reissue Standard
Ludwig recently announced the reissue of the 1930s Standard model, which is based on the coveted two piece brass shell. Here is Ludwig's marketing blurb:
A few good things jump out: the shell itself, the classy oval Monroe badge that evokes memories of the Ludwig & Ludwig badge from the period, and even the P86 throw-off, which has a vintage vibe and modern reliability. As a side note I do wish Ludwig would use screws for tightening the pressure bar that can be tightened and loosened with a drum key instead of requiring a screw driver. But that is for another post.
Ludwig Drum Company is proud to announce the limited availability of the 1930 “Standard” Model Reissue, Nickel-Over-Brass Snare Drum. A collaboration between Ludwig and Italian goldsmith Adrian Kirchler, The “Standard” Reissue is the first snare in the modern era to use Ludwig’s original 2-pc. Shell. “The original Standard and Deluxe models used two thin, brass sheets that were hand-rolled and joined together at the bead,” states Kirchler. “A very strong shell was then formed using the traditional double-crimped bearing edge on the top and bottom. This new Standard model is absolutely true to the original 2-pc shell design.”Before I begin citing why I am disappointed with this reissue, let me say some positive things about Ludwig. First, they have been listening to drummers. There were three Ludwig employees participating on Drumforum.org when I was active on that forum. And it remains one of the best forums on the web in my opinion. I marveled at how responsive Ludwig was to discussions. Not necessarily with respect to the Ludwig folks jumping into debates. Instead they showed they were listening by releasing new products that had an uncanny resemblance to recommendations and ideas that surfaced during discussions. So don't take this post as sour grapes or showing disrespect to Ludwig the company. On the contrary, I believe they are the most responsive drum company when it comes to actively listening to rank and file customers and proactively introducing products that match what they hear. Think of any other company - drum or otherwise - that is that responsive these days. You probably can't.
The original Standard and Deluxe models are –of course- more commonly known today by their modern names: Chrome-Over-Brass and Black Beauty. After Conn purchased Ludwig and Ludwig in the early 30’s, the single-piece shell construction used today was implemented, and the original 2-pc. Standard shell became a thing of the past.
Here is the drum, and I will dissect the problems I see with it:
A few good things jump out: the shell itself, the classy oval Monroe badge that evokes memories of the Ludwig & Ludwig badge from the period, and even the P86 throw-off, which has a vintage vibe and modern reliability. As a side note I do wish Ludwig would use screws for tightening the pressure bar that can be tightened and loosened with a drum key instead of requiring a screw driver. But that is for another post.
What I personally don't care for (and this is totally subjective): the brass hardware. It clashes visually (to me) with the nickel finish over the brass shell. Worse, it detracts from the floral engraving in the two panels, drawing attention away from some of the artistry that Mr. Kirchler added to the shell. I am also not crazy about the P33 butt because it is anything but low mass and will probably interfere with the shell's resonance. On the plus side, the P33 can be tightened and loosened with a drum key. I could probably live with it, but I would rather see the venerable and very low mass P32 as a butt. Again, that is a personal preference.
What I believe makes this snare drum a miss is Ludwig's choice of die cast hoops. Why take a thin, two-piece shell, then choke the life out of it with die cast hoops? This isn't the 80s when Tama and other companies touted die cast hoops and drummers bought into the hype. Die cast hoops have a place in the studio to be sure, but for live playing they will negate all of the advantages (and mojo) of that beautifully crafted two piece shell. Worse, those heavy hoops kill any visual link back to the original of which this model is a reissue. Before someone chimes in using Gretsch's tried and true die cast hoops as a counter argument, those hoops that made their round badge drums special were much lighter than modern die cast hoops. In fact, the Gretsch die cast hoops are probably on par with modern 2.3MM triple-flanged hoops.
A few thoughts: if the drum is aimed at collectors who are going to put it in a glass case and gloat over bragging rights, use single-flange hoops like on the Ludwig 95th Anniversary snare drum. That would also please some orchestral drummers, and it would be a truer reissue. Sourcing them is not a challenge these days. Since Ludwig's Black Magic snare drums appear to be sourced from the same suppliers as those Worldmax uses - down to the S9X throw-off and shells - single-flanged, COB hoops and clips are readily obtainable. If the drum is going to be played instead of sitting in a case, then the owner can quickly and inexpensively swap in triple-flange hoops like so many owners of the original two-piece shell drums are already doing.
Despite my dislike of what appears to be a pastiche instead of a reissue, I have to commend Ludwig for listening and attempting to reissue the 1930s Standard. I believe they missed the mark with this particular snare drum, but they have been hitting bullseyes with so many other products that they are allowed a few stumbles.
Wednesday, August 18, 2010
Good Reason for Another Build - Part 2
Although my last post was ostensibly about the DW Mag throwoff and 3P butt, it quickly turned into a snare drum design to mount them on.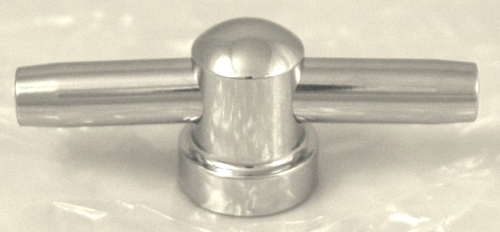
That lug has a vintage look that will compliment the throwoff design, and will also let more of the beautiful veneer I discussed in my last post to show through.
This post will tie up a few loose ends regarding the rest of the specifications. First, I finally settled on the lugs. I thought long and hard about using turret style lugs to keep the spirit of DW in the design elements, but just could not bring myself to do it. To me they are ugly.
One supplier I often use is Best Drum Deals. Their prices are reasonable, they ship fast and provide excellent service, so I checked their catalog and found the AG-1 Chrome Double Ended Snare Drum Lug shown below:
That lug has a vintage look that will compliment the throwoff design, and will also let more of the beautiful veneer I discussed in my last post to show through.
The snare bed I am opting for is going to be wide and shallow like modern Ludwig snare beds. That design will accommodate a wide range of snares. For more about snare beds see this post. For snare wires I usually go with 12- or 16-strand. When I use 12-strand I use Puresound Concert wires. However, for this drum I am going to use 16-strand Worldmax German Steel Wires. I have found these wires to be equal in all respects to the Puresound 16-strand Custom series, and at a fraction of the price.
Head selection is fairly straightforward: a Remo Diplomat for the snare side will give me maximum sensitivity to take advantage of the 3P butt, and a Remo Coated Ambassador on top makes for a perfect combination.
While I often have snare drums built with single-flanged, chrome over brass hoops with clips, a set runs close to $140. To keep costs down I am going to go with 1.6MM triple flange hoops. They provide nearly the same open, resonant response as the single flange hoops, and will allow a lot more sensitivity than 2.3MM hoops. For the same reason - achieving an open, resonant sound - I am going with eight lugs. In fact, all of the drums I have custom made have eight lugs because I personally think that ten lugs are not required on a snare drum. And certainly not on a snare drum that you want to be resonant and open-sounding.
Although it sounds trite, I have a strong preference for Pearl tension rods. Unlike other tension rods with a thin chrome plate on the threads, these rods are more substantial in weight and look to be better machined. Since they cost the same or less than generic rods I always use them for new snare drums, and when I have to replace bent rods on drums that I restore.
As the project progresses I'll provide updates.
Tuesday, August 17, 2010
DW Mag Throwoff and 3P Butt: A Good Reason for Another Build
I recently stumbled across the DW MAG throwoff and 3P butt combination. Aside from the price, which is considerably lower than many boutique throwoffs, this model has features that I find appealing.

What truly got my attention, though, is the 3P butt. You can preset snare tension in three steps with the flick of a lever. This feature is similar to the tension adjustment system built into the Trick GS007 throwoff. It allows you to quickly change from a higher tension setting that gives a fairly dry sound that works well in rock or louder music, to a medium tension that is better suited for press rolls and a more defined snare response, to a wet sound that works well with second line drumming. Here is a photo of the 3P butt, showing the adjustment lever:
As mentioned in the title, this throwoff is a good reason for another build. Let's start with the shell. I want to base the drum on a versatile size, and you can never go wrong with a 5"x14" form factor. Second, I want the shell to be a Keller VSS 6-ply with reinforcement rings. I selected the 6-ply because the thinner shell will more freely vibrate relative to the more common 10-ply shells, which will result in a fuller sound, higher resonance and far greater sensitivity. The tradeoff is loss of projection and volume compared to a 10-ply shell, but I prefer quieter drums. For more information on how shell thickness affects a drum, Mike Radcliffe's discussion in his excellent Tuning Drums article titled Drum Shells is essential reading.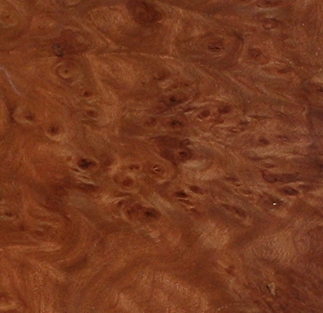
A final, and important, technical decision is selecting the best bearing edge. I normally prefer 30 degree edges with a fat roundover. That reflects my preference for vintage sounding drums. However, since this drum will incorporate the 3P butt and the ability to quickly set tension, I am going to go with a double-45 degree edge that is slightly rounded over. This will give the drum maximum sensitivity that will leverage the features of the 3P butt. For more information about bearing edges see my post titled Properities of Drum Shells and Bearing Edges and the bearing edge video in my post titled My Approach to Tuning.
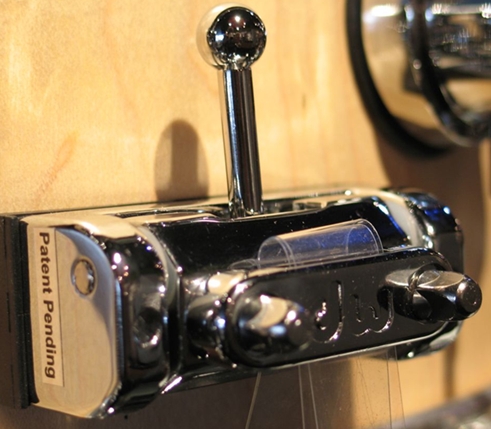
First, I have always preferred the Gladstone style strainers where the engagement and disengagement of snares are via a sideways lever. I also like the easy-to-reach fine adjustment knob that is horizontal, and the fact that it employs a magnet to hold the throwoff bail in the engaged position. That feature alone eliminates friction mechanisms that stick or bind. Here are photos of the throwoff on a snare drum, and with the bail in the disengaged position. There is no doubt that when disengaged the snares are completely off the snare side head:
What truly got my attention, though, is the 3P butt. You can preset snare tension in three steps with the flick of a lever. This feature is similar to the tension adjustment system built into the Trick GS007 throwoff. It allows you to quickly change from a higher tension setting that gives a fairly dry sound that works well in rock or louder music, to a medium tension that is better suited for press rolls and a more defined snare response, to a wet sound that works well with second line drumming. Here is a photo of the 3P butt, showing the adjustment lever:
As mentioned in the title, this throwoff is a good reason for another build. Let's start with the shell. I want to base the drum on a versatile size, and you can never go wrong with a 5"x14" form factor. Second, I want the shell to be a Keller VSS 6-ply with reinforcement rings. I selected the 6-ply because the thinner shell will more freely vibrate relative to the more common 10-ply shells, which will result in a fuller sound, higher resonance and far greater sensitivity. The tradeoff is loss of projection and volume compared to a 10-ply shell, but I prefer quieter drums. For more information on how shell thickness affects a drum, Mike Radcliffe's discussion in his excellent Tuning Drums article titled Drum Shells is essential reading.
Beauty enters into the equation too. I intend to procure the shell from Drum Foundry's pre-veneered shell selection. I have long lusted after a shell finished in Carpathian Elm, so I now have an excuse. Here is what that wood looks like:
A final, and important, technical decision is selecting the best bearing edge. I normally prefer 30 degree edges with a fat roundover. That reflects my preference for vintage sounding drums. However, since this drum will incorporate the 3P butt and the ability to quickly set tension, I am going to go with a double-45 degree edge that is slightly rounded over. This will give the drum maximum sensitivity that will leverage the features of the 3P butt. For more information about bearing edges see my post titled Properities of Drum Shells and Bearing Edges and the bearing edge video in my post titled My Approach to Tuning.
I have not decided upon the lugs I intend to use. In the spirit of a theme I should select the "turret" style of lug DW uses since I am using a DW throwoff, but I dislike that style immensely. Indeed, I have disliked it since the 1960s when it was called the Aristocrat lug by Camco
The easiest decision is contracting with a builder. My first choice is Kevin Smee of Bowie Custom Drum. Kevin has built a few snare drums for me in the past and his workmanship is first rate, his turnaround time is faster than any other custom builder I have used, and his prices are below market.
As this saga unfolds I will post updates.
Sunday, August 15, 2010
New arrival: 4x14 vintage wood snare with no markings
It sometimes takes a simple event to overcome overwhelming grief and start writing in this blog again.
There are no markings, and it could very well be made by Walberg & Auge, Lyon & Healy, or any number of early 1900s drum companies. I am guessing the shell was made by Leedy because it appears to be walnut and U.G. Leedy had a marked preference for walnut and maple as drum shell tone woods. Leedy also provided shells to other manufacturers.
The drum itself arrived in dire need of a cleaning. There were 90 plus years of dust, dirt and gunk covering all of the parts. I followed my process for cleaning and restoring, and in two days got the drum to a clean (but not pristine) and playable state. The throwoff works perfectly, the tension rods now move freely, and the snares provide a sound that only wound, cable snares from that era can provide. Here is a shot that shows the snares more clearly:

One risk of obtaining these old wood snare drums is too often modern heads will not fit them. I was fortunate that I was able to achieve a perfect fit to the shell and the hoops with modern Remo heads. I had a pair of heads laying around that I threw on it, but my long term goal is to have a set of calfskin heads made for it. In the interim, I am going to order a Remo Renaissance Ambassador snare side head, and a Remo Fiberskyn FA for the batter. This is a departure from my normal head selection, where I always use a thinner Diplomat weight on the snare side, and, when I am using Fiberskyn heads for batter sides I use a Diplomat weight also (when I am using normal coated heads, I usually go with Ambassador weight.) The reason I am planning to use heavier heads on this snare drum is it is extremely lively. That is partly due to the shallow depth, but I am pretty sure the old growth woods used back when it was made is a factor as well. The wood on both the shell and hoops are extremely heavy and dense compared to the same shells from the same species today. All of the old growth wood is gone.
The event is my acquisition of a snare drum type that I had long wanted, but somehow had eluded my best efforts to get one at a reasonable price. Thanks to AuctionSniper I managed to grab this baby for $81.00:
There are no markings, and it could very well be made by Walberg & Auge, Lyon & Healy, or any number of early 1900s drum companies. I am guessing the shell was made by Leedy because it appears to be walnut and U.G. Leedy had a marked preference for walnut and maple as drum shell tone woods. Leedy also provided shells to other manufacturers.
Regardless of who made it or the brand under which it was sold, the drum is the early single-tension, free floating design that was the norm in the early 20th century. The reinforcement rings inside the four inch deep shell are the same species of wood as the shell itself, and the hoops are maple.
I particularly like the throw-off design, which foreshadows Billy Gladstone's design:
The drum itself arrived in dire need of a cleaning. There were 90 plus years of dust, dirt and gunk covering all of the parts. I followed my process for cleaning and restoring, and in two days got the drum to a clean (but not pristine) and playable state. The throwoff works perfectly, the tension rods now move freely, and the snares provide a sound that only wound, cable snares from that era can provide. Here is a shot that shows the snares more clearly:
One risk of obtaining these old wood snare drums is too often modern heads will not fit them. I was fortunate that I was able to achieve a perfect fit to the shell and the hoops with modern Remo heads. I had a pair of heads laying around that I threw on it, but my long term goal is to have a set of calfskin heads made for it. In the interim, I am going to order a Remo Renaissance Ambassador snare side head, and a Remo Fiberskyn FA for the batter. This is a departure from my normal head selection, where I always use a thinner Diplomat weight on the snare side, and, when I am using Fiberskyn heads for batter sides I use a Diplomat weight also (when I am using normal coated heads, I usually go with Ambassador weight.) The reason I am planning to use heavier heads on this snare drum is it is extremely lively. That is partly due to the shallow depth, but I am pretty sure the old growth woods used back when it was made is a factor as well. The wood on both the shell and hoops are extremely heavy and dense compared to the same shells from the same species today. All of the old growth wood is gone.
The drum is surprisingly snappy sounding considering the cable snares and the single tension system. One thing is certain: this drum will get played. It sounds too good to spend its remaining days in a display case.
Monday, May 3, 2010
Reason for the three week silence
I experienced a personal tragedy, so my posting was put on hold for the past three weeks.
In a day or so I will be back with some [hopefully] interesting information. The next post will trace the development of the bass drum pedal.
Sunday, April 11, 2010
Some of my favorite cymbals: Zildjian Armand Series
At one time the focus of my gear acquisition was the quest for the cymbal sound. I somehow managed to acquire 85 (mostly Zildjian) cymbals, new and vintage, before the obsessive-compulsive side of my nature turned to snare drums. That triggered the great cymbal sell-off to fund my snare drum addiction.
The first step was to satisfy myself that I had the cymbal sound I was seeking. Cymbal sounds actually, because I wanted cymbals that would work with jazz, blues and classic (1950s/1960s) rock. As I culled the cymbals I wanted to sell from the pile I discovered some gems that were keepers.
The first ones to go into the keeper pile were my Armand series. Specifically, the 19" Beautiful Baby ride, a pair of 14" Armand hi-hats, and a 21" Armand ride. I almost always use only a single ride and a pair of hi-hats when I am playing, so the 18" Medium Thin Crach and its 16" Medium Thin sibling went into the sell pile. I managed to acquire the entire set in a trade I had done.
What I love about the Armand series is they sound very similar to the cymbals that Joe Morello used on the 1959 Time Out album. Although Zildjian advertises the Armand series as a cymbal that captures the classic 60s rock sound, they also represent the sound of the 1950s Avedis cymbals.
In particular, the 19" Beautiful Baby ride has a shimmering sound (thanks in part to the three-rivet cluster) that works beautifully in jazz, R&B and classic rock ballads. As I write this, that is the cymbal that is currently mounted on my 1961 Slingerland kit - and it is all the ride cymbal I need at the moment.
The 21" Armand ride still shimmers, although without rivets, and has the right balance of brightness and wash, which makes it one of the most versatile ride cymbals in my arsenal.
In the 21" Armand ride you can hear Mitch Mitchell backing Hendrix, John Densmore backing the Doors, and even some of the classic jazz drummers.
The 14" Armand hi-hats, like the rides, have a vintage sound and feel. I like the action of these hats, and when you have your clutch loose you can get a great sizzle sound for playing big band and jazz, as well as getting a nice "chick" sound. You can use these hats in just about any musical situation and be pleased. They have a lighter feel than modern Zildjian New Beat hats, which have grown heavier over the years, but are close to the original New Beats designed by Louis Bellson, and are nearly identical to the Zildjian hi-hats that preceded the New Beat line.
The key to these cymbals is the umbrella like profile that characterized the Zildjians made in the 1950s and early 1960s. If you study vintage cymbals - and a good place to start is The Vintage Cymbal Guide - you will see how closely the Armand rides resemble the vintage Zildlian rides, especially the profiles and bells. Zildjians cymbal anatomy briefly describes the parts of a cymbal and how it affects the sound:
In addition, I recommend this page, which includes a more detailed description of the anatomy of a cymbal.
If you are looking for a versatile set of cymbals that will work with just about any genre (metal, perhaps, being an exception), check out the Armand series. I am pleased with mine because they have worked in every scenario in which I've used them with the exception of low volume acoustic work.
Friday, April 9, 2010
Some Quick Tips on Second Line Drumming
One of the more elusive styles is the New Orleans second line drumming that has been around since jazz was born. The grandfather of this style may well have been Louis Cottrell Sr., however, the style was propagated to a much wider audience by Baby Dodds and others.
There is a segment by Johnny Vidacovich who diiscusses (and demonstrates) not only the second line style, but other New Orleans music which was derived from the roots. This clip of Vidacovich is not from the video, but does contain some of the techniques he discusses in it, with an emphasis on the all important clave rhythm:
The late, great Earl Palmer is also in the video. He discusses the influence of New Orleans drumming on popular music of the 1950s and 1960s. Palmer is one of the most recorded drummers in history, along with Hal Blaine, so it is illustrating to discover how pervasive the New Orleans and second line influences are to contemporary (for that period) music.
My favorite video that demonstrates the old style, as well as the evolution of second line, is New Orleans Drumming. One clip, in particular, from the video is performed by Herlin Riley who does a beautiful job of demonstrating the traditional form:
There is a segment by Johnny Vidacovich who diiscusses (and demonstrates) not only the second line style, but other New Orleans music which was derived from the roots. This clip of Vidacovich is not from the video, but does contain some of the techniques he discusses in it, with an emphasis on the all important clave rhythm:
The late, great Earl Palmer is also in the video. He discusses the influence of New Orleans drumming on popular music of the 1950s and 1960s. Palmer is one of the most recorded drummers in history, along with Hal Blaine, so it is illustrating to discover how pervasive the New Orleans and second line influences are to contemporary (for that period) music.
The final segment is performed and discussed by Herman Ernest, who shows the influence of early New Orleans drumming on funk.
If you want to dig deeper into the art of second line drumming I recommend Stanton Moore's A Modern Approach to New Orleans Drumming, which may be more in line with a more modernized approach to learning the style. Moreover, Moore's DVD is more focused on instruction, making it a great learning tool.
Moeller Technique (and other tips by Derrick Pope)
As a follow-up to two previous posts (My Favorite Instructional Videos: Grooves and Woodshedding!), these instructional videos by Derrick Pope are pure gold:
Moeller Technique
One-Handed Rolls
Double Stroke Technique
One-Handed Rolls
Double Stroke Technique
Watch and learn!
Thursday, April 8, 2010
More on brush playing
Scattered throughout this blog are posts about playing brushes:
- On Playing Brushes Part 1: The Vocabulary
- On Playing Brushes Part 2: Creative Writing
- On Playing Brushes Part 3: The Thesaurus
- Clayton Cameron on Tap Dancing and Brushes
Update: See Jon McCaslin's excellent blog post, The Art of Brushes: Roundtable Discussion for more about Steve Smith's instructional video.
Wednesday, April 7, 2010
Pearls from Pearl
In my opinion Pearl, like Ludwig, knows how to make a snare drum with mojo. I have yet to play a snare drum from either company - even their low end models - that was a dog.
The only reason I sold it was it was too loud for my tastes. The rock drummer who now owns it is pleased.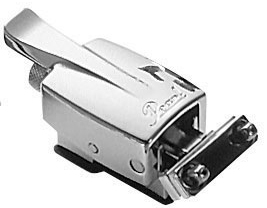
Overall it is a versatile snare drum that is often overlooked because of its low price and the fact that it has a steel shell. The only reason I sold mine is because I was on a vintage snare drum quest and I had other metal shell snare drums that rendered the Chad Smith model redundant.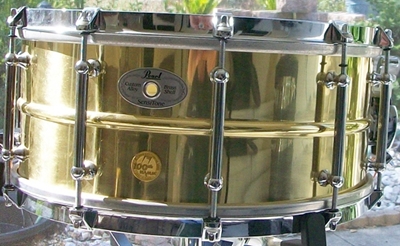
This snare drum started my love affair with Pearl Sensitone snare drums. My favorite feature is the single flange hoops with heavy duty hoop clips that give this snare drum an open sound. It works extremely well with brushes, and has a wide dynamic range from soft to loud. It also is one of the more sensitive snare drums I've owned.
I love everything about the 50th Anniversary - single flange hoops, steambent maple shell, and even the special edition Fiberskyn head. This particular snare drum proved to me that Pearl could make a wood snare drum that has the same mojo as their metal models. This led me to the 6.5x14 Pearl MHX Masters Mahogany Snare Drum, which is - in my opinion - the equal of any wood snare drum Ludwig makes (and Ludwig will always be the benchmark.) This snare drum has a 4-ply mahogany shell and 4-ply maple reinforcement rings, and is perfect for any musical style. I did not like the die cast hoops that it came with, but after throwing a set of triple flange hoops on the snare drum sang.
My introduction to Pearl snare drums came about when I purchased a bare Pearl Sensitone steel shell off eBay. The story behind the purchase is somewhat humorous and a lesson to not drink and browse eBay. However, the finished product after I outfitted the shell with lugs, throw/butt, hoops, etc. turned out to be a great sounding (and looking) snare drum.
The only reason I sold it was it was too loud for my tastes. The rock drummer who now owns it is pleased.
My next Pearl was the Chad Smith signature model. I was pleasantly surprised by the wide tuning range and sensitivity of this instrument, which is among the low end snare drums offered by Pearl. Even with stock heads and snares it was more than adequate for jazz, blues and classic rock. One feature I especially like is the Pearl SR-015 strainer, which is a Gladstone style throwoff shown below:
Overall it is a versatile snare drum that is often overlooked because of its low price and the fact that it has a steel shell. The only reason I sold mine is because I was on a vintage snare drum quest and I had other metal shell snare drums that rendered the Chad Smith model redundant.
I next acquired a Pearl 6.5x14 brass Sensitone Special NAMM edition:
This snare drum started my love affair with Pearl Sensitone snare drums. My favorite feature is the single flange hoops with heavy duty hoop clips that give this snare drum an open sound. It works extremely well with brushes, and has a wide dynamic range from soft to loud. It also is one of the more sensitive snare drums I've owned.
I feel that you cannot go wrong with any of the many Sensitone models, but I especially like the 6.5x14 Sensitone Elite Beaded Phosphor Bronze Snare (easily the equal of my Special NAMM edition Sensitone), and the 5x14 Pearl Sensitone Elite Beaded Aluminum Snare, which sounds like a vintage Ludwig Acrolite. The 5x14 size of the aluminum model is more versatile than a deeper snare drum, and the shell gives it a wood-like sound, making it a good compromise between a metal and a wood snare drum.
My Special NAMM edition snare drum will always have a place in my snare drum arsenal, as will my Pearl 5.5x14 50th Anniversary snare drum.
I love everything about the 50th Anniversary - single flange hoops, steambent maple shell, and even the special edition Fiberskyn head. This particular snare drum proved to me that Pearl could make a wood snare drum that has the same mojo as their metal models. This led me to the 6.5x14 Pearl MHX Masters Mahogany Snare Drum, which is - in my opinion - the equal of any wood snare drum Ludwig makes (and Ludwig will always be the benchmark.) This snare drum has a 4-ply mahogany shell and 4-ply maple reinforcement rings, and is perfect for any musical style. I did not like the die cast hoops that it came with, but after throwing a set of triple flange hoops on the snare drum sang.
Bottom line: Pearl knows how to make snare drums. In my opinion you cannot go wrong with even their low end models, and their high end models are simply amazing. More importantly, every Pearl snare drum I have owned or played worked beautifully out of the box, which is refreshing considering that the first thing I do with a new snare drum is change the heads and snare wires.
Tuesday, April 6, 2010
Five Star Tips
Need some quick advice on tuning, head selection and a plethora of other topics? This collection of short tips is worth checking out.
Friday, April 2, 2010
Properties of Drum Shells and Bearing Edges
In My Approach to Tuning I briefly discussed the importance of bearing edges and shell material. Eric J. Macaulay's paper, Properties of Drum Shells and Bearing Edges adds a significant amount of information to what I touched upon. In addition, the following articles will add more information to aspects of drum construction that affect the sound of a drum:It all comes down to knowing your instrument. I hope the foregoing helps you to understand aspects of drums that too many drummers ignore.
Thursday, April 1, 2010
Wood or Metal Shells? Here's a Compromise
Many drummers have marked preferences for either metal or wood snare drums, and usually stick to their preferences. Not all drummers, of course, because some drummers will select the right instrument for a specific venue or recording session.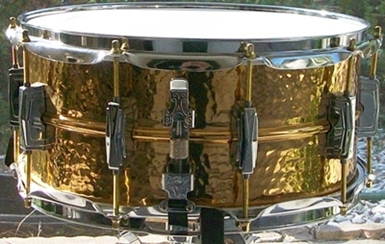
That is the snare drum that induced me to try metal sell snare drums. The hammering dried out the sound sufficiently to give it a distinct wood tone, and the bronze shell contributed to the tone and sensitivity, making it ideal for brushwork. In fact, it is an extraordinarily sensitive drum considering the shell depth. At first I wasn't sure if it was the bronze shell or the hammering that imparted the sonic qualities I found so desirable. I became convinced after I acquired another hammered shell snare drum - a 5x14 hammered Supraphonic:

Not only is the depth more shallow, but the shell is made from Ludalloy (Ludwig's term for chrome plated aluminum.)
I have a personal theory that preferences are often based on the first snare drum a drummer owns. I prefer wood snare drums, and it's probably because my first drum kit in 1964 came with a wood snare drum. The sonic characteristics of our first snare drums tend to imprint us. Wood snare drums are typically warmer than metal, and have tonal qualities that a metal snare drum cannot deliver. Metal, and especially brass, tends to project more, sound brighter, and - when tuned a certain way - has a "honk" that appeals to many drummers.
Certain snare drums, however, have sonic characteristics of both shell types. The Slingerland copper snare drum I discussed in my last post has wood-like sound qualities. Part of the reason is the copper shell, which gives the drum a softer, almost diffused tone.
There is another class of metal shell that possesses the same qualities: hammered metal. I own two, both made from different types of metal, that would fool many in a blindfold test.
The first is my Ludwig 6.5x14 hammered bronze snare drum:
That is the snare drum that induced me to try metal sell snare drums. The hammering dried out the sound sufficiently to give it a distinct wood tone, and the bronze shell contributed to the tone and sensitivity, making it ideal for brushwork. In fact, it is an extraordinarily sensitive drum considering the shell depth. At first I wasn't sure if it was the bronze shell or the hammering that imparted the sonic qualities I found so desirable. I became convinced after I acquired another hammered shell snare drum - a 5x14 hammered Supraphonic:
Not only is the depth more shallow, but the shell is made from Ludalloy (Ludwig's term for chrome plated aluminum.)
Like the bronze shell model, the hammered Ludalloy model is drier than a standard Ludalloy Supraphonic, and has wood-line tone.
To truly ensure that it's the hammering and not the shell material I tested out a Ludwig 5x14 hammered brass Black Beauty. The test was apples-to-apples against the Ludalloy hammered Supraphonic in that the depths were identical. Result: same dry, woody quality as the other hammered shell snare drums. It was actually a surprise because brass is a much brighter sounding metal when used for drum shells.
The conclusion is if you want a snare drum that shares some of the most important characteristics of both wood and metal, then a hammered shell snare drum (or one with a copper shell) may be the best solution. I've used Ludwig snare drums as examples because I own and have first hand experience with them. Most major drum companies offer hammered shell snare drums, mainly made from brass, including Gretsch, Pacific, Peace and Worldmax. They are worth a look if you are seeking a versatile snare drum that has tone with a bit more projection.
Wednesday, March 31, 2010
Slingerland 6.5x14 Copper Snare Drum
This drum is from the Music-Yo era that is usually associated with the nadir of the Slingerland brand. However, some of the snare drums from this era, and particularly this copper model, are excellent and represent a great value if you come across one.
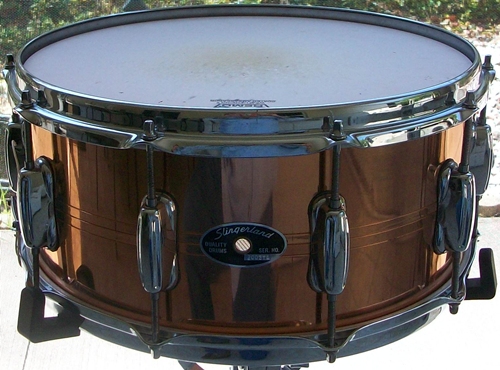
The Zoomatic strainer has always been the weak link on any Slingerland snare drum from any era in my opinion. However, the one on this particular snare drum works well. I did disassemble it to clean and lubricate it, which accounts for the problem-free operation it gives me.
The drum itself sounds wood-like. This quality comes from the relatively thin, copper shell. It also has a fairly wide tuning range - a surprise - and is one of the better snare drums I have for brushwork.
Because it has a deep shell and because of the thin, copper construction, it is well suited for low volume venues. Controlling the dynamic range, particularly in the PPP to F range, poses no problem with 7A sticks.
I've gotten the best results with the resonant head tuned high and the batter medium. If you tension the snare wires low this snare drum makes buzz rolls and shuffles sound amazing. The wires will go to medium tension before they choke, so it is probably not the best choice for heavy backbeat music.
I have had this snare drum for a few years, but rediscovered it today when I was looking for another snare drum. It is now set up on my kit as the snare drum in rotation for this week. Sometimes owning 60 snare drums can be a curse as well as a blessing because you can often overlook a gem. I can assure you it will get a workout this week.
Monday, March 29, 2010
Inexpensive Video Recording Solutions
One of the most powerful practicing aids is to record your practice sessions. I do this to not only catch those serendipitous moments when a mistake leads to a new lick or variation on a groove, but to also check my posture and state of relaxation. I have caught recurring tenseness more than once, as well as less optimum movements, which leads to overall improvement.
If you teach there is a lot of value in recording your students' lessons for playback and critique.
Finally, having an inexpensive video recorder is great for sharing tips and techniques - or even gigs - with fellow drummers. YouTube is full of such videos, and many are great learning experiences (not the mention the self confidence you gain from posting your drumming.)
The current darling of the music world is the Zoom Q3 Video Recorder. The key strength of this particular recorder is the outstanding audio capture, which has no rival in low-end video recording devices. Moreover, it does not need an external microphone. What it lacks is truly good video capture. In order to obtain decent video you need very good lighting. Also, despite the Zoom name, it's zoom features are abysmal at best. For recording practice sessions and lessons it is, in my opinion, weak. For capturing performances, however, it is my first choice because of the audio features.
Here is the manufacturer's product review that steps through the main features:
Another review, done by the great Peter Erskine, is not as slick, but he used the Q3 to make the video, so you will get a more realistic view.
If, like me, your main use is as a practice or lesson aid, then you may find the Kodak Zi8 Pocket Video Camera to be better suited to your needs. One key advantage is, unlike the Q3, you can purchase an inexpensive remote control for the Zi8 . This is an essential feature for any recording device that is used to capture practice sessions (unless you can convince someone to operate the recorder for you.) A quick summary of features is provided in this manufacturer's video:
As mentioned, the remote control feature alone sets this recorder apart from the Q3 for capturing practice sessions. The video is better than the Q3, although the audio is not going to come close to what you can achieve with the Q3.
While both the Q3 and the Zi8 function well as hand held recorders, for recording practice sessions you are going to need a tripod. My favorite is the Vista Explorer 60" tripod because it is easy to adjust to any angle, sturdy and relatively inexpensive.
There are other video recording solutions besides the two I mentioned. I feel that the Q3 and the Zi8 are two of the best values for low-end solutions, and each has key strengths for different purposes: the Q3 for recording live gigs or making demos, and the Zi8, with the add-on remote control, for recording practice sessions and lessons.
Saturday, March 27, 2010
Treasures from the Web
In my recent post, My Approach to Tuning, I cited some tuning tips by Mike James. Among the other treasures on his site are a series of articles on recording, the art and science of arranging, transcribing and composing, and some excellent tips on tuning and technique.
The real treasure, however, is a free book that you can download titled, Drumming for Life, that is a compendium of tips on dynamics, playing and more on Mr. James' philosophy on tuning. This is, in my opinion, essential reading for any drummer at any playing level.
One other resource that I recommend is Hal Howland's The Human Drummer: Thoughts on the Life Percussive, which at one time was available for free download from Hal's web page. The book is almost a modern day admixture of Homer's Odyssey and the collected works of Plato - applied to drumming and drummers. The list of accolades from famous drummers for this book is impressive.
Thursday, March 25, 2010
Hey Jude ... Take a Bad Drum and Make it Better
A recurring lament expressed by new owners of the Gretsch Catalina Club Jazz kits, as well as other low end, competing kits such as the Tama Stagestar, is the bass drum and toms sound fantastic, but the snare drum doesn't.
One of the modifications I make to any snare drum that comes equipped with plastic snare wire straps is to replace them with grosgrain ribbon. In most cases the simple (and inexpensive) replacement of the plastic snare wire straps with grosgrain ribbon will result in an immediately noticeable improvement in snare response.
There is a reason why the snare drum in particular is the weak link: the shell is made of Philippine mahogany, also known as Luan. That is the one characteristic that the Gretsch Catalina Club Jazz kit shares with its cousins, including the Japanese stencil kits of yesteryear.
Philippine mahogany is a fairly soft wood compared to higher-end shell material, and it absorbs more of the energy when you strike the batter head than maple or other premium shell woods. This diffuses the sound and affects the shell's resonance. One of the reasons that this has less effect on bass drums and toms is the snare drum is shallow relative to the other drums and is more sensitive to the wood characteristics.
Another reason, again related to shell depth, is these drums are mass produced and there are tolerance variations, especially in critical areas such as bearing edges. Where the shallow depth comes in is that the drum will be more sensitive to small variations and imperfections in the edges than a deeper drum.
To be fair to Gretsch and other companies making these drums, when you are cranking out thousands of kits for the low end market, doing a final polish on the bearing edges is an extra step that adds cost. A good enough bearing edge is sufficient from a manufacturing perspective. And to be fair, the edges are good enough for a low end kit. Unless, of course, if you happen to want to wring out better tone and response from the snare drum.
Here are a few tips to transform that weak link in the kit into a snare drum that is more than adequate. I'll provide the tips from least to most expensive. Also note that I am focusing on the snare drum, but the tips can apply to all of the drums in the kit. In addition, these tips will work with vintage Japanese kits, such as Whitehall, Star and a plethora of other stencil drum kits that flooded the market in the 1960s.
Dressing Bearing Edges
The single most effective thing you can do [in my experience] is to dress the bearing edges. Tools and materials are 320 grit sandpaper and a dressing compound.
320 grit sandpaper is sufficiently fine to polish the edges while removing any tiny rough spots. The dressing compound I prefer is a Carnauba wax bar. They are inexpensive and one bar will last a long time. However, there are other valid dressing compounds. Two master drum builders, both of whom I hold in the highest regard, have differing approaches that you may want to consider. J.R. Frondelli simply wipes on a coat of varnish, while Kevin Smee of Bowie Custom Drum uses a paste wax such as Briwax or Johnson's fine finishing wax. Another product that will work well if you want to go this route is Minwax Paste Finishing wax. Regardless or your choice - and you do have choices - the dressings will seal any air gaps in the bearing edge and provide a smooth surface for seating your drum heads.
Step 1 is to lightly go over the bearing edges with the 320 grit sandpaper. The operative word here is lightly. You want to remove any minute high spots and polish the edges, not do any major surgery. I fold the paper over the edge, taking care to not touch the outside finish or wrap, and lightly follow the circumference of the shell. Be sure to follow the contour of the snare beds too. You should feel a very slight resistance when you begin. In fact, you can hear a slight scratchy noise. As you proceed and make an entire pass the resistance will diminish, as will the scratchy sound. Once the resistance and scratchy sound are gone, you are ready for the next step - wiping the dust off the edges. A clean cloth with a touch of denatured alcohol works well.
The final step is to dress the edges. If you opt for a varnish dressing per J.R. Frondelli's approach, use a clean cloth and wipe on a very small amount on the edges and let dry. If you opt for the wax (be it the Carnauba wax bar or paste wax), lightly apply the wax and buff it out. For this step I use Meguiar's X2020 Supreme Shine Microfiber. Reassemble the drum, tune it up and I believe you will be treated to a discernible difference in sound.
Coating the Shell Interior
This approach, along with dressing the bearing edges, will give you the most bang for your buck, but is more time consuming than dressing the bearing edges. I have found that coating the shell interior is the key to dramatic improvement in the sound of the snare drum that ships with the Catalina Club Jazz kit (as well as the other drums I mentioned above.) It does give the snare drum a more focused sound, and makes it a bit more sensitive as well. Note: If you elect to perform this step, do it before dressing the bearing edges.
What you will need:
- 3M 2090 Scotch-Blue Painter's Masking Tape
- Shellac (I use Bulls Eye Shellac)
- WD-40
- Clean piece of cotton muslin or other lint free cloth
- Remove all hardware from the snare drum (lugs, throwofd and butt)
- Using the 3M 2090 Scotch-Blue Painter's Masking Tape, mask off of the holes on the exterior side of the shell, and the bearing edges.
- Apply the shellac to the interior of the shell. Do not flood the wood with shellac. I lightly dip the muslin into the shellac that has been shaken per manufacturer instructions, then apply it in a circular motion until I have the interior completely coated. One coat will work, but I usually let the shellac dry for a day, and repeat the process until I have three coats.
- While you are waiting for the shellac to dry take the time to lightly spray WD-40 on the moving parts in the strainer, as well as the tension rod threads. Don't over do it - a little WD-40 goes a long way, and you do not want to reassemble the snare drum with dripping parts.
- After the shellac has dried, remove the tape, reattach the lugs, throwoff and butt, and perform the bearing edge dressing step.
One of the modifications I make to any snare drum that comes equipped with plastic snare wire straps is to replace them with grosgrain ribbon. In most cases the simple (and inexpensive) replacement of the plastic snare wire straps with grosgrain ribbon will result in an immediately noticeable improvement in snare response.
Most plastic snare straps are 3/8" wide, but I typically buy 5/8" wide grosgrain ribbon because it perfectly fits the Catalina Club (and every other) snare drum throwoff and butt. The thinner, 3/8" ribbon can cock when threading it through the strainer and butt clamps, skewing your wires. You can purchase this item, in a variety of colors, from Walmart and any fabric store. Here is a photo of one of my snare drums outfitted with it:
I also replace stock snare wires with premium wires such as the German steel wires. These wires are, in my opinion, the equal of Puresound custom wires, but at a fraction of the price.
Obviously, swapping out the stock heads on the Catalina Club Jazz snare drum is an option that may improve the sound. That said, the heads that come stock with it are relatively decent. I personally prefer different heads, and you probably have your own preferences. However, before rushing out and spending even more money, give the stock heads a try after you have tweaked the snare drum per my tips.
If you do want to explore different heads, you may want to examine some of the recommendations that I made in this post, as well as this follow-on post. You may also find some of the information in my approach to tuning useful.
Now turn that dog into a snare drum you would be pleased to gig with - and good luck.
Monday, March 22, 2010
Brief History Lesson
Here are two interesting (if somewhat trivial) resources dealing with drum history:Somewhat related is Disc #2 of Steve Smith's Drumset Technique/History of the U.S. Beat DVD set. Steve uses period-correct drums and cymbals (and associated hardware) to step you through the evolution of US drum kit playing, starting with ragtime and ending with fusion. The playing and the gear are wonderful glimpses into history.
My Approach to Tuning
There are a number of factors that go into getting the sound you want from your drums, some of which you can control and some which you cannot.
About heads: I play low volume music, mainly acoustic and electric jazz and blues, so my head selection may be vastly different from yours. However, you may find these two posts about head selection for brush playing to be a starting point for understanding head selection. First is about selecting good heads for brushwork, and the second covers a few heads I neglected to mention in the first post. I also have a brief post about snare wires that discusses this important element of sound. To understand snare beds I have found Ronn Dunnett's excellent article to be a good starting point for understanding this often overlooked aspect of a snare drum. Another excellent article on snare beds is Snare Bed Theory. If you actually want to understand how to cut one, Drum Foundry's companion article, The Down and Dirty of Snare Beds, is a great tutorial.
Let's start with what you cannot control:
- Diameter and depth
- Material from which the drum is made: various wood types, metals, plastics and fiber; i.e., acrylic, carbon fiber, etc.
- Bearing edges
- Number of lugs
- Snare beds (for snare drums)
- Head type
- Snare wires
- Hoops
- The Room
This excellent video produced by Drum Supply House is bearing edges 101 and will show why I believe the bearing edge is an important factor in achieving your sound:
About heads: I play low volume music, mainly acoustic and electric jazz and blues, so my head selection may be vastly different from yours. However, you may find these two posts about head selection for brush playing to be a starting point for understanding head selection. First is about selecting good heads for brushwork, and the second covers a few heads I neglected to mention in the first post. I also have a brief post about snare wires that discusses this important element of sound. To understand snare beds I have found Ronn Dunnett's excellent article to be a good starting point for understanding this often overlooked aspect of a snare drum. Another excellent article on snare beds is Snare Bed Theory. If you actually want to understand how to cut one, Drum Foundry's companion article, The Down and Dirty of Snare Beds, is a great tutorial.
The room where the drum(s) will be played is the one variable that bedevils most drummers. A kit or snare drum (and cymbals) that sound great in one room may sound horrible in a different room.
A good starting point to learn about tuning is the Drum Tuning Bible. While it contains excellent information, remember that your personal sound will come from your intimate knowledge of your instrument and where that instrument will be played. While the Drum Tubing Bible will give you the foundational knowledge of your instrument and some excellent tips, it's up to you to personalize your sound.
My starting point with tuning begins with some idea about the room. The placement chapter in the Drum Tuning Bible gives some excellent advice and guidelines that you should follow. I also like the approach Mike James takes in Drum Tuning. Another approach is to think like a sound engineer. Alex Case's Recording the Snare is highly recommended reading.
I don't use muffling aids, such as bass drum pillows, Moon Gel, or gaffer's tape. The only thing I do is lightly attenuate my bass drum with felt strips (I use Gibraltar SC-BF Bass Drum Felt Strips), but otherwise, my drums are tuned open.
My personal approach is to have a basic tuning, and tweak for the room once the kit is set up. I always start with tuning the reso heads first to get the pitch I want, then the batter side for tone.
A trick I use is the two key method where I simultaneously tune opposite tension rods, then move clockwise to the next pair. I also start by backing off the tension slightly before tuning, and use feel to ensure that the tension rods are tensioned about the same. Of course, this is somewhat unscientific and highly subjective (and can be thwarted if you don't occasionally use a light lubricant on the rods.) However it works for me.
I listen for changes in pitch as I tap around the head near the tuning rods - I usually tap about 3 inches away from the rods so I can hear some resonance - and do fine adjustments according to what I hear.
When I am tackling the bass drum I do the initial tuning and have someone hit a few notes while I stand back about ten feet. Often the bass drum will still be too lively and resonant for a room, so I use a full turn at a time on the resonant side tension rods to correct it. Usually I only need one full turn to tame it down, and often need to back off a quarter of a turn.
The drums that give me the most trouble are square ones where square means the diameter and height are the same. Since I play traditional sizes, this means floor toms. Depending on the bearing edge you can either dial one in after some trial and error, or remain frustrated. Like my other drums, I start with the reso head to get the pitch, then work with the batter. If I cannot get a floor tom dialed in to my satisfaction, I will compromise by retuning the rack tom so that I can get an octave between the two and suffer through the tone. Life isn't always fair.
If you are new to tuning (or even drumming) I recommend grabbing a copy of Drum Tuning: The Ultimate Guide. Although this book/CD combination isn't nearly as comprehensive as the Drum Tuning Bible, it is simpler and more straightforward, and the biggest advantage is the CD that comes with it. One can read about tuning, but there is nothing like hearing examples, which the 29-tracks on the accompanying CD provide.
In ending, my approach may or may not work for you, but I hope it serves as a catalyst to get you thinking about the many, interrelated aspects of drum tuning that you can factor in when pursuing your own sound.
Sunday, March 21, 2010
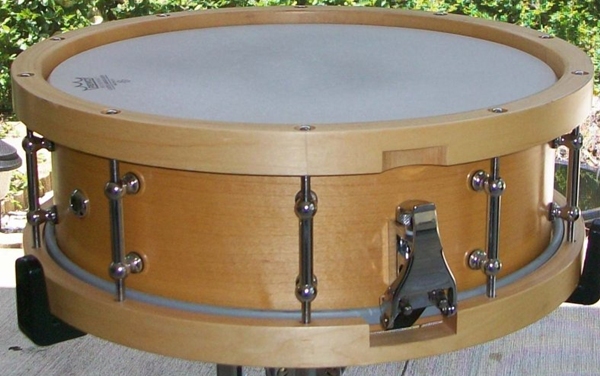
Wood Hoops
More than a few of my snare drums and two of my drum kits are outfitted with wood hoops. There are pros and cons to going this route: on the pro side is the warmth these hoops add to any drum, and, especially for snare drums, the sound you get from cross sticking and rim shots. On the con side is cost and the loss of sensitivity when playing close to the edge of the drum head.

I no longer have any snare drums with the straight hoop on them, but the one I had and sold had the characteristic warmth of wood hoops and was extremely sensitive to the edge of the head. The straight hoops are usually thinner than the Hide-A-Hoop style, and are not as durable in my opinion. On the plus side, though, is some models can be used with regular lugs, whereas the Hide-A-Head style typically requires spacers under the lugs to move them far enough from the shell to accommodate the increased outside diameter of the hoops. This increase is due to the way the Hide-A-Hoop hoop is designed to mate with the head's flesh hoop.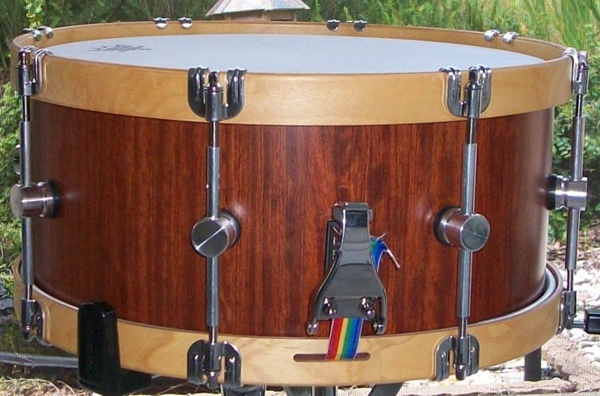

Personally, I love the tone, durability (this hoop is slightly thicker than the straight hoop), and sensitivity of this particular hoop.
Not all hoops are created equal. There are four basic types:
- Yamaha style, which are thick. PDP also makes this type of hoop, as do a few custom wood hoop makers.
- Shaped style, which is basically the Yamaha style that has been shaped to resemble - as best as can be done - a regular drum hoop.
- Straight, which is similar to the metal band and wood hoops used on early drums.
- Hide-A-Hoop, which is similar to the straight style, but has a counter groove cut to fit over the flesh hoop on drum heads in the same manner as a double-flanged hoop on 1930s-1940s snare drums (see this post for more information.)
The shaped head shown in this photo is a compromise - you still have lots of wood and tone, but you gain back a modicum of sensitivity:
I no longer have any snare drums with the straight hoop on them, but the one I had and sold had the characteristic warmth of wood hoops and was extremely sensitive to the edge of the head. The straight hoops are usually thinner than the Hide-A-Hoop style, and are not as durable in my opinion. On the plus side, though, is some models can be used with regular lugs, whereas the Hide-A-Head style typically requires spacers under the lugs to move them far enough from the shell to accommodate the increased outside diameter of the hoops. This increase is due to the way the Hide-A-Hoop hoop is designed to mate with the head's flesh hoop.
The Hide-A-Head hoop, like the straight hoop, gives drums a warmth while not significantly hampering sensitivity or shell resonance. Here is a snare drum and a kit configured with this hoop style:
Personally, I love the tone, durability (this hoop is slightly thicker than the straight hoop), and sensitivity of this particular hoop.
There are a few things you need to consider when purchasing Hide-A-Head hoops:
- Thickness - will the mini-claws fit it? I had to sand down parts of these hoops from some sources to get the mini-claws that are shown in the above photo to fit over the hoop. If you are using a bass drum claw this isn't a problem.
- Before rushing out and grabbing a set make sure you have a strategy for adding spacers to your lugs so that they protrude far enough off the shell to accept the tension rods into the lug receivers. If you are using tube lugs, be aware that they are not forgiving of tolerance errors.
- Be prepared to spend money. You need more than just hoops - you will need claws, longer tension rods and lug spacers. These add up quickly, so carefully cost it out before purchasing the hoops. Also, if you decide to use the mini-claws that are shown in the above photos, you may find that they are nearly impossible to get. There are times when they are readily available from multiple sources, and other times when you cannot get them amywhere.
The choices are many, but the nice thing about hoops is they can be swapped out to quickly change the characteristics of a snare drum. While I have enough snare drums to just grab the right one for a particular room, just having an extra set of hoops to throw on for specific playing situations makes a lot more sense than having an extra snare drum. Any of the hoop styles, and especially the Yamaha and shaped ones, will tame down a snare drum that is a bit too lively for a room when it has normal hoops. Plus, playing a wood hoop snare drum (or kit) is fun!
Saturday, March 20, 2010
Adjusting Ludwig Supersensitive Snare Drums
The question, How do I adjust my Super Sensitive snare drum? comes up from time to time. Here is how I approach adjusting mine.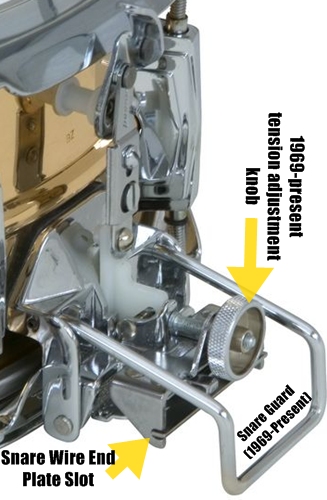
The following series of photos will show the nomenclature of my 1966 Super Sensitive, and the parts of which you need to be aware to change wires and/or adjustment the snare tension for optimum performance.

Note the differences between the older models and the modern ones. The adjustment knob on the pre-1969 models are smaller and placed unobtrusively, and the snare guards are quite different. Also note that the basic adjustment and wire end plate slots are similar enough that changing wires and adjusting either model will work per my advice. Here is a photo of the butt side of the drum:

You have a clear view of the wire end plate and how it fits into the slot. The 1969-present models are similar, with the differences noted above. These two photos show how the wire end plates fit into the slots:

Changing wires is relatively simple. You back off the tension adjustment knobs equally (turn them simultaneously for best results) until there is enough slack to remove the end plates from the slots. Don't attempt to remove both end plates at the same time - remove one without stretching the wire, then the other. If you are removing the wires to change heads, mark which end plate goes into the strainer side to make sure it goes back the same way. While either way will fit, I like to be extra cautious and make sure that parts that are under tension are always reassembled exactly the way they were disassembled.
Notice that in the example above the end plates extend exactly 0.25 inches beyond the bearing edges on each end. Also note that the wire tension is only tight enough to prevent sagging (you will need to check this with the snare drum in the normal playing position on a stand.)
Note that I am using a pre-1969 model as an example, but the same principle applies to the 1969 and later models because, although the mechanism has changed, the basic parts are still present in an updated form. Remember, this mechanism has been used in some form since the 1920s, so it has withstood the test of time. The first mechanism was basically unchanged from 1920 until 1968 (the example I am using).
Before proceeding, and to eliminate confusion, here is what a modern (1969 and later) mechanism looks like:
The following series of photos will show the nomenclature of my 1966 Super Sensitive, and the parts of which you need to be aware to change wires and/or adjustment the snare tension for optimum performance.
Note the differences between the older models and the modern ones. The adjustment knob on the pre-1969 models are smaller and placed unobtrusively, and the snare guards are quite different. Also note that the basic adjustment and wire end plate slots are similar enough that changing wires and adjusting either model will work per my advice. Here is a photo of the butt side of the drum:
You have a clear view of the wire end plate and how it fits into the slot. The 1969-present models are similar, with the differences noted above. These two photos show how the wire end plates fit into the slots:
Changing wires is relatively simple. You back off the tension adjustment knobs equally (turn them simultaneously for best results) until there is enough slack to remove the end plates from the slots. Don't attempt to remove both end plates at the same time - remove one without stretching the wire, then the other. If you are removing the wires to change heads, mark which end plate goes into the strainer side to make sure it goes back the same way. While either way will fit, I like to be extra cautious and make sure that parts that are under tension are always reassembled exactly the way they were disassembled.
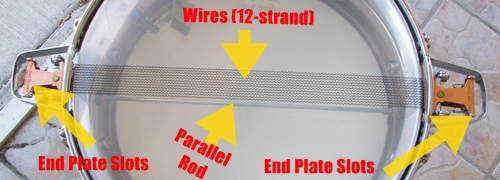
If you are replacing the wires, make sure you purchase the correct wire for the model year you own. Puresound makes wire sets for the 1920-1968 Super Sensitives, and a slightly different set for the 1969-present models. Aside from the end plate tabs that fit into the slots, there are other differences between the two models, both of which are designed for optimal performance for the Super Sensitive snare drums for which they are made: the pre-1969 wires are 15" long with 12 strands, and the 1969-present wires are 16 7/8" long with 16 strand wires.
When installing the wires, use the tension adjustment knob to make sure the inward part of the snare wire end plates are equally spaced relative to the bearing edge of the snare drum shell. This photo shows properly installed wires:
Notice that in the example above the end plates extend exactly 0.25 inches beyond the bearing edges on each end. Also note that the wire tension is only tight enough to prevent sagging (you will need to check this with the snare drum in the normal playing position on a stand.)
Tune your heads to your personal taste before fine tuning the wire tension. After you have your heads tuned, adjust the snare wire tension by turning the tension adjustment knobs simultaneously. I have found that the lightest tension - just beyond the wires sagging in the center - will provide the most sensitivity. The tighter you tension after that point, the drier the sound becomes (which may be desirable for concert and symphony work.) Do not over tension the wires! If you over tension you run the risk of stretching the wires, which will shorten their life at best, and ruin them at worst.
If you don't have a hard shell, foam lined case for your Supersensitive see Storing and protecting Supersensitive Snare Drums for a case I recommend.
If you have further questions don't hesitate to contact me.
Wednesday, March 17, 2010
Clayton Cameron on Tap Dancing and Brushes
In On Playing Brushes Part 3: The Thesaurus I discussed a clip on Clayton's DVD that dealt with the relationship between tap dancing and brush playing. I don't have that clip, but in this Ludwig promotional clip he reiterates much of what he discussed in the DVD (sans the duet with the tap dancer):
Tuesday, March 16, 2010
A few heads I left out and words about the best snare drum for brushes
In my haste to complete my last post I left out one head model that I use on many of my vintage snare drums: Aquarian's American Vintage series. The coating on this head is similar to the Aquarian Texture Coated drumhead that I mentioned in my last post. Unlike the Texture Coated model, the American Vintage does not have the plastic-like sound quality, although I still prefer the tried and true Remo coated Ambassador. Call me a creature of habit.
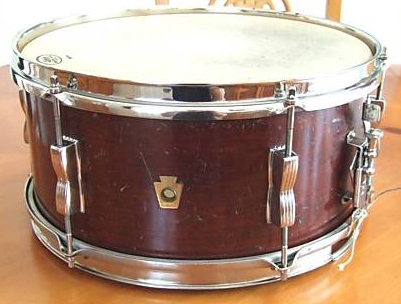
The above transition badge Ludwig Pioneer at 5x14 inches is near perfect for brush and stuck playing and I find myself reaching for it often. If you are interested in how I restored her, see this post.
This 6.5x14 inch Ludwig Pioneer, concert model, is another of my favorite snare drums for brush playing.
A bit more about the American Vintage - many older snare drums require this head because modern heads are designed to fit modern shells. Today's 14" diameter snare drums are actually based on a 13.85" shell, whereas many of the vintage snare drums have a 14" shell, which makes for a frustrating experience getting a modern head onto the older shell (as well as properly fitting the older hoops onto the collar of the heads, which tend to go past the collar.) Keep this in mind when purchasing vintage drums.
One head I didn't cover is the Evans J1 Etched model. The reason I overlooked it is because I have no direct experience with it, but a fellow forum member on DFO uses them and offered to give his opinion and experiences. His name is Chris Worrick (cworrick on DFO) and here is what he had to say about the Evans J1:
As for the J1 - I think it was someone on the forum that turned me on to this head, but I don't remember who. I don't know the exact specs, but it feels and responds more like a Remo Ambassador to me rather than the usual Evans heads but without the Remo break in period. It is just a touch more lively which is great for the brushes. I don't know how they are doing it, but the etching surface on the head seems to be in the plastic rather than a coating on the head so it doesn't wear near as quick (I usually only have to change once a year after the tone has been wore out).A big thanks to Chris for taking the time to add his experience and thoughts!Con - the surface may be a little smoother than a coated head so there is not as much bite, but it last longer with it's surface than a coated head.
I've played Remo coated ambassadors and Evans coated G1s and I like the durability and sound I get with the J1. I have not had the chance to try the Aquarian head you mentioned in your article (I have also heard some other drummers mention it as well).
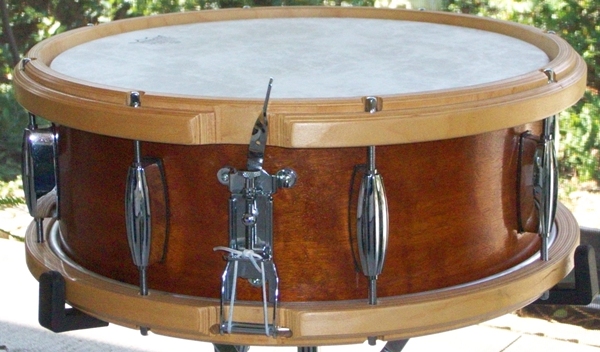
The big questions is which snare drum works best with brushes? The answer is any snare drum that has appropriate heads and is properly tuned will work well. Either of my two favorite snare drums will work well; however, if you are seeking a specific snare drum for brushwork I recommend 6-lug models, preferably an old Ludwig or WFL Pioneer, Leedy or Slingerland student model. Why six lugs? To my ear they are open sounding, which supports brush playing, and these old snare drums work well with sticks. When possible I acquire the old 3-ply, mahogany models, ideally with single flanged hoops.
Here are a few examples of snare drums I use frequently for brushwork (and shuffles when playing with sticks):
The above transition badge Ludwig Pioneer at 5x14 inches is near perfect for brush and stuck playing and I find myself reaching for it often. If you are interested in how I restored her, see this post.
This 6.5x14 inch Ludwig Pioneer, concert model, is another of my favorite snare drums for brush playing.
In fact, many of the vintage student model snare drums, including some 8-lug models, work exceptionally well with brushes. One great thing about the 6-lug and other student models is that they are going for bargain prices on eBay and other outlets.
As you have probably noticed from the examples I gave, I use snare drums of different depths. There is no perfect depth for snare drums used in brush playing, although many drummers prefer deeper ones, while others swear by the versatile 5x14 or 5.5x14 size. Even 4x14 works well, and especially so if you are playing Latin-style music because the shallow snare drums have a nice timbale sound when the snare are dropped, which greatly complements that music style. Moreover, a 4x14 snare drum tends to be crisper for certain music, such as bebop. The bottom line, though, is any snare drum (properly tuned with appropriate heads) will work with brushes in any music style.
If you have any questions or think you have spotted that perfect snare drum on eBay or craigslist and want advice don't hesitate to contact me.
Monday, March 15, 2010
Selecting Heads and Brushes for Brush Playing
After wrapping up my three part series on brush DVDs in my last post I will take care of dangling wires in this one by discussing the heads and brush models that I prefer.
The best head I have ever used for brush playing is the Aquarian Texture Coated drumhead. The trademarked Satin Finish on this head makes it a joy to use with brushes; however, when playing this head with sticks it has a plastic sound to my ears. So, while I would use it on a brush-only gig, I have yet to have such a playing opportunity. One advantage to the Aquarian Texture Coated head is the fact that it needs very little break-in time when you mount a new head.
My go to head is the Remo coated Ambassador. I have used this head for as long as I can remember, and it sounds just fine to my ears for both brush and stick playing. However, unlike the Aquarian Texture Coated head, the coated Ambassador needs some break-in time after you mount a new one. I usually spend about an hour with a new head to break it in before using it in a live playing situation. Some drummers will lightly sand a new Ambassador to hasten the break-in period, but I prefer to not go that route because it shortens the life of the head. Moreover, I have gotten Ambassadors that lose the coating prematurely (apparently from a batch that slipped by their quality assurance department), making the sanding technique iffy.
Other heads that I like with brushes are calf skin (see my post titled, More on Calfskin Heads), Remo's Fiberskyn Diplomat, Skyntone, and Renaissance heads in both Diplomat and Ambassador weights.
Among the choices cited above, the Skyntone head has sufficient texture to use with most brushes, while the other choices have less texture with which to produce the soup stirring, legato sweeps we commonly associate with ballads. Personally, I manage to get the sound I want from any of them, but if you want a bit more projection there are two brush models that will allow you to attain it with some of the smoother heads: the Vic Firth Steve Gadd Wire Brush and the Zildjian SDWB3 Bent Bristle Brushes. I personally dislike the feel of either brush - they are too thick for my tastes, and I am not overly fond of the balance. However, we are all different, so give them a try if you want to play brushes on a few of the heads I mentioned, but hesitate because you prefer more coating.
I like the Fiberskyn Diplomat very much. It is a warm sounding head for stick playing and also sounds nice with brushes. I use the thinner Diplomat weight because I can achieve a vintage calf skin-line sound and still get resonance that the heavier Fiberskyn Ambassador does not provide. Note: Avoid at all costs any Fiberskyn head that is a Powerstroke model. These heads have a plastic ring that kills resonance and does not work well with brushes.
The Skyntone works beautifully with both sticks and brushes. It is thin to the point where you need to be concerned if you play mainly with sticks and are a heavy hitter. While the tone I get from these heads is superb to my ears, it's possible that they will need frequent replacement. Thus far I have had no problems with them, but I am an extremely light hitter and I play mostly between PP and F. The texture is similar to genuine calfskin, including simulated pore holes.
The Renaissance Diplomat is another personal favorite (and, as with the Fiberskyn heads, avoid the Powerstroke version for brushwork). While the surface does not have the texture many brush players demand, I have used this model with regular brushes for everything from ballads to train beats. I particularly love the resonance I get from the Renaissance heads with both brushes and sticks. One caveat is these heads do not have the playing life that a coated Ambassador or even a Fiberskyn head will provide, especially if you play heavy with sticks.
Before discussing my favorite brush models, let me put a frequent question to rest. I am often asked, aren't rods better than brushes? referring to specialty sticks like the Pro-Mark Cool Rod. The answer is they are designed to do two different things. One of the essences of brush playing is to anchor the time with sweep patterns that have a legato sound. The Cool Rods are strictly staccato, and are not a replacement for brushes. Indeed, bear in mind that the approach to brush playing is totally different from stick playing, and using brushes just to achieve low volume playing isn't really brush playing at all. The best way to achieve low volume playing, if that is your goal, is to either develop your technique for achieving the dynamics for a given song, or use something like the Cool Rods.
Another question I'll attempt to answer is, Should you play brushes with the snares off or on? Quick answer: both ways work. A more drawn out answer is when I started playing in 1964 I was taught to always drop the snares when playing with brushes. When I began to take brush playing seriously I learned that you can do either. My preference is to drop the snares on ballads and for some Latin-style music, otherwise I generally keep the snares engaged. There is no right way in my opinion. Experiment and do what sounds best to you. And always let the music dictate what and how you play. So much for the Zen of Brush Playing according to Tarrani. On to my favorite brushes.
I love the feel of the Regal Tip Clayton Cameron model. In fact, at one time I used them exclusively. As my brush playing skills progressed I found that fixed brushes were too limiting because I wanted to reduce the fan of the wires on my right hand brush. This allowed me to do standard 8th note triplet patterns with my right hand while keeping time with sweeps handling the 1-2-3-4 with my left hand. That led me to retractable brushes, and the two models I have come to prefer are the Regal Tip Jeff Hamilton Signature Brushes and the Regal Tip Ed Thigpen Wire Brushes. Both feel good in my hands, and although the Ed Thigpen model is a bit heavier and thicker than I normally like, the balance is why I use it. I also like the Vic Firth Heritage Brush, which has a nice, vintage feel to it. I tried and don't care for the Vic Firth Jazz Brush because of weight and balance - you may have a different opinion since brushes - like sticks - are highly personal choices. One other brush model that I like for certain situations is the relatively new Regal Tip Yellow Jacket Retractable Brush. This model is About .5 inches shorter than the Vic Firth Heritage Brush and about the same weight. The feel is different due to the minor difference in length and the wires, which are a much lighter gauge. The wires definitely flex more and are similar to the feel of nylon, while still producing the distinctive sound that only a wire brush can provide. The wire is such a thin gauge that you may encounter problems with them falling out under heavy playing (I have heard a few such stories on various forums), so you may want to consider a pair for ballad playing on heads such as the Remo coated Ambassador because, unlike other brushes, these do not catch on new heads and require less break-in time. This model also comes in a shake out version. I don't care for any type of shake out or throw out style of brush because I never seem to get them fully extended for one thing, and I prefer my right brush to have less wire fan for the other. Also, as that style of brush wears, they tend to retract back into the handle while you are playing - definitely not a good thing!
A few tips on maintaining and using brushes: First, use the plastic tube that they came in to store them. While this is especially important for fixed brushes to extend the life of the wires and maintain them in their original shape, it applies to retractable brushes as well. I have bent more than one handle on retractable brushes because of careless storage. Second, mark your brushes so you always use the same one for your right hand, and the other for your left. This also maintains the shape of the wire fan, and extends the life because they will wear in properly. Taking this a bit further, I always make sure that I play them with the labels facing up for the same reason.
A few parting notes. First, if you travel and tend to bring a practice pad to keep your chops up, you know that brushes and standard practice pads don't work well together. Consider the Rhythm Tech Lap Top Practice Snare Drum, which is a mere 13"x1". As an alternative, you may want to consider the Sabian Quiet Tone Snare Drum Practice Pad, although it is a bit larger and heavier than the Rhythm Tech pad. Finally, since I have discussed the relationship between brush playing and tap dancing in a number of previous posts, you may find Tap with Ginger Series to be a way to tap into [pun intended] your creative side by playing along to some of the lessons. Of better, adding tap dancing to your skill set. It worked for drummers from Papa Jo Jones to Steve Gadd! Seriously, this video is an interesting play along with brushes, and since it covers beginners to expert, you can start slow and try different brush patterns against the same lessons as you work through the DVD.
Subscribe to:
Posts (Atom)